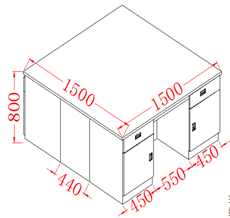
Installation and Commissioning Guide for the YR06013-10 Stainless Steel Laboratory Work Bench
The YR06013-10 stainless steel laboratory workbench is a robust and versatile solution designed for various laboratory applications. This guide outlines the steps necessary for the installation and commissioning of this particular model, ensuring optimal performance and longevity.
Overview of the YR06013-10 Workbench
The YR06013-10 is constructed from high-quality 304 stainless steel, featuring a work surface thickness of 12.7 mm with reinforced edges of 25 mm. This structure offers resistance to strong acids and alkalis, ensuring durability in demanding laboratory environments. The bench is designed to support various laboratory activities, making it an essential piece of equipment in any professional setting.
Technical Specifications
| Model | Description | Size mm (W*D*H) |
|---|---|---|
| YR06013-10 | Stainless steel - Island workbench | 1500*1500*800 |
Unboxing Checklist
Before you begin installation, ensure that you have all necessary components and tools. The unboxing checklist should include:
- YR06013-10 workbench
- Adjustable feet
- Hinges and handles
- Assembly tools (wrenches, screwdrivers, etc.)
- User manual and warranty information
Installation Steps
Follow these steps to install the YR06013-10 workbench correctly:
Step 1: Preparing the Location
Select an appropriate location for the workbench, ensuring it is level and has sufficient space around it for movement and maintenance. Ensure that the environment is clean and dry, and that the power supply requirements are met.
Step 2: Leveling the Workbench
Once the workbench is in place, adjust the feet to ensure that the surface is level. Use a spirit level to confirm that there are no high or low spots. This step is crucial to avoid operational issues later on.
Step 3: Securing the Workbench
Secure the workbench to the floor if necessary, particularly in environments prone to vibration or movement. Anchoring can be done using appropriate hardware based on the flooring material.
Step 4: Installing Additional Components
If there are any additional components to be installed (such as shelves or cabinets), follow the manufacturer's instructions for proper installation. Ensure all components are securely fastened.
Step 5: Final Inspection
Conduct a final inspection to ensure everything is properly installed and secured. Check for any loose parts or misalignments, and make adjustments as needed.
First-Power Up Sequence
To power up the YR06013-10 for the first time, follow these steps:
- Ensure all connections are secure.
- Check that the workbench is properly leveled and anchored.
- Power on the electrical system (if applicable).
- Monitor for any unusual sounds or error codes during the initial power-up.
Common Installation Mistakes
Be aware of the following common mistakes that can occur during installation:
- Improper leveling, leading to functional discrepancies.
- Inadequate securing of the workbench, increasing the risk of movement or tipping.
- Neglecting to remove packing materials, which can interfere with operation.
- Ignoring local regulations or safety standards in the installation area.
Frequently Asked Questions
What are the maintenance requirements for the YR06013-10 workbench?
Regular maintenance includes cleaning the surface to prevent corrosion, checking for loose components, and ensuring that the adjustable feet remain secure for leveling.
How do I troubleshoot if the workbench appears unstable?
Check the leveling of the workbench and ensure that all feet are adjusted properly. Additionally, verify that it is securely anchored to the floor if required.
What is the weight capacity of the YR06013-10 workbench?
The YR06013-10 is designed to support significant weight; however, specific weight limits can depend on the type of use and distribution of weight across the surface.
Can the YR06013-10 be customized with additional accessories?
Yes, the YR06013-10 can be customized with various accessories such as additional shelving, cabinetry, and specialized mounts based on the specific laboratory needs.
What certifications does the YR06013-10 meet?
The YR06013-10 meets various industry standards for safety and performance, ensuring it is suitable for professional laboratory environments. Specific certifications can be verified through the manufacturer's documentation.
How often should I perform a full inspection of the YR06013-10 workbench?
A full inspection should be conducted at least annually, or more frequently in high-use environments, to ensure optimal safety and performance.
If you are looking for a fusion of innovation and quality, you have come to the right place. At Kalstein, we offer you the luxury of exploring our exclusive catalog of laboratory equipment. We manufacture every device to the highest standards of excellence. Our intuitive and seamless online purchasing channels are designed for your convenience, securing the most competitive prices. Hesitate no longer — we bring science to life, it is time to become part of our community.