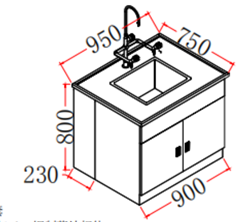
Installation and Commissioning Guide for the YR06013-7 Stainless Steel Work Bench
The YR06013-7 Stainless Steel Work Bench is an essential component in any laboratory setting, designed for durability and functionality. This guide focuses on the installation and commissioning of this specific model, providing users with practical steps to ensure optimal performance. By understanding how to properly set up the YR06013-7, users can maximize their investment and maintain a high standard of work.
Unboxing and Initial Setup
When the YR06013-7 arrives, it's crucial to perform an initial check to ensure all components are present and undamaged. Unboxing should be done carefully to avoid any scratches or dents. The standard components you should find include the stainless steel work surface, adjustable feet, and the cabinet frame. A checklist is provided below to assist you in this process:
| Component | Status |
|---|---|
| Stainless Steel Work Surface | Check for scratches and dents |
| Cabinet Frame | Verify structural integrity |
| Adjustable Feet | Ensure all are included and functional |
Anchoring and Leveling the Work Bench
For the YR06013-7 to function effectively, it must be anchored securely and leveled properly. Begin by positioning the work bench in the desired location. Use a level tool to check the surface; adjustments can be made using the adjustable feet. Once leveled, consider anchoring the work bench to the floor for additional stability, especially if it will bear heavy equipment or materials. Use appropriate anchors suited for the floor type.
Connecting Utilities and Equipment
The YR06013-7 may require connections to water or gas supplies depending on the lab setup. Ensure that any plumbing work is done by a certified professional to avoid leaks. Once utility connections are made, perform a system check to confirm there are no leaks and that everything is functioning as intended.
Power-Up Sequence and First Calibration
Before powering up the YR06013-7, ensure all electronic components are correctly connected. Power up the equipment in the following sequence:
- Turn on the main power supply.
- Activate any integrated systems, such as sinks or electrical outlets.
- Perform a quick functional check on all features to ensure they respond appropriately.
Calibration is key for ensuring accurate performance. Follow the manufacturer’s guidelines for initial calibration procedures. This usually involves checking the alignment of the work surface and making any necessary adjustments based on the laboratory’s specific requirements.
Common Setup Mistakes and How to Avoid Them
During the installation of the YR06013-7, users often make critical mistakes that can lead to inefficiencies or equipment failure. Common pitfalls include:
- Improper leveling: Always use a level tool to ensure stability.
- Neglecting utility connections: Confirm that all necessary connections are secure and functional.
- Skipping calibration: Calibration is vital for ensuring accurate measurements; never skip this step.
Technical Data Table for the YR06013-7
| Model | Description | Size (W x D x H) mm | Weight (kg) | Price (USD) |
|---|---|---|---|---|
| YR06013-7 | 304 Stainless Steel Sink Work Bench | 950 x 750 x 800 | 65 | 570.00 |
Frequently Asked Questions
What is the weight capacity of the YR06013-7 work bench?
The YR06013-7 is designed to support a substantial amount of weight. However, specific weight limits depend on the configuration and materials used on the workbench. Always check with the manufacturer for recommended weight limits for safety.
How do I maintain the YR06013-7 stainless steel surface?
Regular maintenance involves cleaning the stainless steel surface with mild soap and water. Avoid abrasive cleaners that can scratch the surface. For persistent stains, consider using a stainless steel cleaner.
Can the YR06013-7 be customized for specific lab needs?
Yes, the YR06013-7 can be customized with various accessories, such as additional shelving, specialized sinks, or integrated electrical outlets, depending on the laboratory's requirements.
What are the environmental conditions required for the YR06013-7?
The YR06013-7 should be installed in an environment that maintains a temperature range suitable for laboratory work, with adequate ventilation and humidity control. Ensure that the workbench is positioned away from extreme heat sources or moisture.
What is the warranty on the YR06013-7?
The YR06013-7 typically comes with a standard warranty which covers manufacturing defects. Be sure to review the warranty terms and conditions upon purchase for full details.
Are there any specific cleaning products recommended for the YR06013-7?
For cleaning the YR06013-7, it is recommended to use non-abrasive cleaners specifically designed for stainless steel. This will help maintain the appearance and integrity of the surface.
For additional inquiries, feel free to request a quote on Kalstein Plus.
If you are looking for a fusion of innovation and quality, you have come to the right place. At Kalstein, we offer you the luxury of exploring our exclusive catalog of laboratory equipment. We manufacture every device to the highest standards of excellence. Our intuitive and seamless online purchasing channels are designed for your convenience, securing the most competitive prices. Hesitate no longer — we bring science to life, it is time to become part of our community.